
Painted Frames- Option 2:
Option 2 calls for the use of the Elmers Glue All. Choosing your option comes after you’ve painted the first coat of paint on the frame. This option needs to go a little quicker than Option 1.
Supplies are basically the same as Option 1, except for the addition of the glue.
Supplies:
Wooden frame- size of your choice.
Sandpaper in a medium to fine grit. 100 grit is my choice. 60 grit is optional.
Several small paint brushes in various sizes. Small enough to fit the frame width, and also to fit in the can or cup with the paint in it.
2 or 3 disposable plastic cups.
Stir stick (popsicle stick, paint stir stick, end of long handled brush)
Rubber gloves
Water
For Option 2: Elmer’s Glue All ( NOT school glue).
Paint (any kind of water-based acrylic paint. Latex water-based paint works too.) You’ll need at least two colors- one light and one dark.
For Option 3: If you go with 3 colors, be sure that two are similar in shade i.e. two light with one dark or vice versa.
Paint can opener, if you’re using paint in a can.
Paper towels.
Drop cloth i.e. butcher paper, plastic, cardboard. Whatever will protect the surface/table you’re using for your painting area.
Tape to tape down the drop cloth.
2-4 extra cups or jars to sit the frame on to raise it off of the drop cloth.
Hairdryer (optional)
Clearcoat sealer- spray type or brush type (polycrylic)- optional.

The beginning procedure is the same for all options- up to after the first coat of paint is dry.
Let’s begin:
You’ll want to decide whether you want the light colors underneath with the dark on top or the opposite- dark on bottom, light on top. Either way will work as long as there is high contrast between them. If the colors have less contrast, it’s still do-able, but will be much less noticeable, if at all.
After you’ve gotten all of your supplies together and your drop cloth down, you’ll want to take the backing and the glass out of your frame. Set them aside.
Next, you will need to lightly sand the frame with the sandpaper. You don’t have to get aggressive because you just want to rough up the surface. If your frame has a gloss finish, you want to make sure you get all of that sanded until it’s at least dull.
Slightly dampen one of the paper towels and wipe all of the dust off of the frame. Make sure there aren’t any leftover pieces of paper towel on the frame. While it’s drying, open your paint. For this frame I used some latex acrylic (interior house paint) that was in the sample size. If that’s what you’re using, you’ll need to stir it. The can was small so I just used a popsicle stick. After it’s thoroughly stirred, you can either leave it in the can, or pour some into one of the plastic cups. *If you’re using an acrylic craft paint, just shake it and pour some into the cup. Sometimes the paint is a little too thick and I mix in a tiny bit of water to get it to spread more easily.
Set your extra cups or jars up so that they will be under the frame when you set it down. If the frame’s not off the drop cloth material, it more than likely will stick to it after it’s dry and you try to pick it up. Using the brush that’s about the same width as the frame, begin painting. Be sure to get the sides and into all of the grooves, if there are any. Clean up any drips or globs on the bottom edges. You can put a light coat of paint on the back too if you want.

Before you set it down or run out of room where you’re holding it, dry it with the hairdryer. This is optional, but really, really speeds things up. If it’s dry enough to hold on a painted spot, finish painting the frame. If it’s not dry enough, then finish painting it while it’s sitting on the cans. If you’re using the hairdryer, be sure to get that spot where you were holding it.
Begin Option 2:
Make sure the first coat (whether it’s one or two colors) is completely dry. If it’s not, it’ll smear when you brush the glue and/or when you paint the final coat of paint on. You will want to prepare your last color of paint before you start with the glue so it’ll be ready.
You can pour some glue into one of your cups and brush it on from there, or you can just apply it straight from the glue bottle. Thick glue makes bigger crackles, thin glue makes smaller or finer crackles. In this example, I just applied it straight from the glue bottle. If you apply it with a brush from a cup, you won’t have to spread it again. But, it will start to dry faster. Once you apply the glue, you’ll need to be more aware of the time it’s taking you to do the next steps. You will want to put the glue in random spots, or where you think the crackle would look best.

If you’ve plopped it on from the bottle, you’ll need to get one of the smaller brushes (one that you haven’t used to paint the frame) and spread the glue a bit. Brush it parallel, with the frame, rather than across the frame. Try to keep it contained to the areas where you put it. Unless you want it crackled all over, which is cool too.
If you’re putting the glue on with a brush from a cup, then just brush it on parallel with the frame. Again, pick random spots to brush it on.

Here’s where the time becomes important. You don’t want the glue to fully dry before you put that last layer of paint on over it. But you don’t want it so wet that it just smears with the paint. I will say, if you err, it’s better to err on the wet side. Once it’s dry, there’s not really much you can do. There may be really small, thin spots that dry early. It’s ok. It may just be on the surface and will still work when you put the paint over it.
Once you spread the glue, you’ll need to wait. Somewhere between 30 seconds to 60 seconds. The glue should be tacky when you touch it. Thicker spots will probably be more soft and wet. That’s ok too.
Gently paint over the glue with your top, final color. Don’t press into the glue, just brush over it lightly. Use just a regular layer of paint. Be careful about going back over spots.

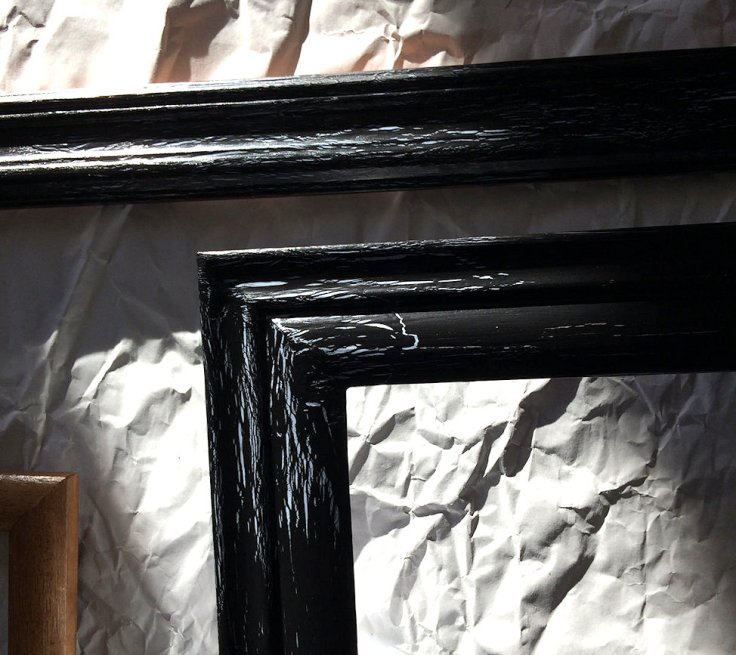
As you wait & watch, it should begin to stretch and crackle. If it’s not doing much, you can get it to do more with the hairdryer on low. The heat will cause the glue to dry faster and stretch under the paint, creating the crackles. Once it stops, let the frame sit for a day or two.

Then if you want to, you can use a clear coat spray sealer or a brush sealer for the top coat. It can be in either matte or gloss, depending on what you like. Just make sure that it’s a water-based sealer for acrylics. You should let the sealer dry/cure for a few days before putting the frame back together with your photos or artwork. The sealer is optional. I didn’t seal mine. I figure they’re going to be in the house and won’t have to withstand any weather or wear & tear.
Here’s a frame with a dark metallic blue on the bottom and a matte creamy white on the top. I really love how that looks.


Have fun painting your frames!


Leave a comment